
CatRealm Self-Hosted Server
Welcome to the CatRealm self-hosting documentation. Get your own CatRealm chat server running in minutes — on Windows, Linux, or through a Pterodactyl panel.
CatRealm is an open-source, self-hostable chat platform with text channels, voice chat, roles, permissions, and more. These docs cover everything you need to deploy and configure your own instance.
Dependencies
CatRealm requires very few dependencies to run:
| Dependency | Version | Notes |
|---|---|---|
| Node.js | v20 or higher | v24 LTS recommended for best compatibility |
| Git | Any recent version | Optional — required only for auto-update feature |
Start.bat / Start.sh) can automatically detect and install missing dependencies for you.OS Support
| Platform | Support | Notes |
|---|---|---|
| Windows 10 / 11 | Supported | x64 recommended. Uses Start.bat |
| Linux (Ubuntu, Debian, etc.) | Supported | Ubuntu 20.04+, Debian 10+, or any modern distro |
| macOS | Experimental | Uses Start.sh — works but not officially tested |
| Pterodactyl | Supported | Official egg available — see Pterodactyl section |
Windows Server
The easiest way to get started on Windows — no terminal required.
Manual Install
Download the latest release as a ZIP, or clone with Git:
git clone https://github.com/VanillaChan6571/CatRealm-SelfHostable-Server.git
cd CatRealm-SelfHostable-ServerDouble-click Start.bat in the folder. If Node.js is missing or outdated, depinstaller.bat will launch automatically — it uses Windows Package Manager (winget) and may request a UAC prompt.
On first launch the server will create a .env file and open it in your default editor. Set at minimum your SERVER_NAME and any optional settings, then save.
After saving your config, run Start.bat again. The server will start on port 40500 by default.
Open a browser and go to http://localhost:40500. To allow other devices, update SERVER_URL in your .env to your local IP.
Linux Server
Run CatRealm on any modern Linux distribution.
Auto Installer
The fastest way to install CatRealm on Linux is the hosted auto-installer:
bash <(curl -fsSL https://raw.githubusercontent.com/VanillaChan6571/CatRealm-SelfHostable-Server/refs/heads/main/catrealm-auto-installer.sh)Manual Install
git clone https://github.com/VanillaChan6571/CatRealm-SelfHostable-Server.git
cd CatRealm-SelfHostable-Serverchmod +x Start.sh./Start.shIf Node.js is not installed or outdated and you have nvm, you'll be offered automatic installation. Otherwise you'll receive manual instructions.
On first run, a .env file is created from the example template. Edit it to set your server name and any other settings, then save.
nano .envThe server will start on port 40500 by default. Check the logs printed to the terminal to confirm it's running.
Manual Installation
If you prefer to skip the launcher scripts:
npm install --omit=dev
cp .env.example .env
nano .env          # edit your configuration
node src/index.js  # start the server
Running with PM2 (Production)
For a persistent, production-grade setup, use PM2:
# Install PM2 globally
npm install -g pm2

# Start CatRealm
pm2 start src/index.js --name catrealm

# Auto-start on system reboot
pm2 startup
pm2 savepm2 logs catrealm and check status with pm2 status.Pterodactyl Egg
CatRealm has an official Pterodactyl egg for easy panel-based hosting.
Hoster Setup
In Pterodactyl, go to Admin → Nests → Import Egg and use this URL:
https://raw.githubusercontent.com/VanillaChan6571/CatRealm-SelfHostable-Server/main/pterodactyl-egg/egg-cat-realm-server.jsonCreate a server in your panel, select the CatRealm egg, and choose a CatRealm Runtime image. The current runtime includes ffmpeg, yt-dlp, build tools, and livekit-server.
The egg exposes the following startup variables you can configure in the panel:
| Variable | Default | Description |
|---|---|---|
AUTO_UPDATE | true | Pull latest changes from Git on every startup |
GIT_REPO | Official repo URL | Git repository to pull from |
GIT_BRANCH | main | Branch to pull |
Start your Pterodactyl server. On first boot, the egg installs dependencies, copies the .env.example template, and starts CatRealm. Configure your .env via the panel's file manager, then restart.
SERVER_PORT variable is auto-detected by Pterodactyl — you don't need to set it manually. The panel allocates a port for you.Hosting Features
One CatRealm installation can host multiple independent realms, run first-party bot plugins, and relay mention notifications to central-account mobile users.
Multi-Realm Hosting Optional
Multi-realm mode runs several isolated realms from one installation. Each realm has its own HTTP/WebSocket port, SQLite database, users, roles, messages, and secrets. The realms share the repository, dependencies, uploads, TLS certificate, and one LiveKit media service.
| Per realm | Shared by all realms |
|---|---|
| Port and SQLite database | Repository and node_modules |
| Users, roles, messages, and settings | Uploads and UGC folders |
JWT_SECRET and secure-mode key | LiveKit and TLS certificate |
MULTI_REALM=trueOn first boot, CatRealm safely copies the existing database to data/<port>.db, keeps data/catrealm.db.pre-multirealm.bak, and creates data/realms.json.
{
  "version": 1,
  "realms": [
    { "port": 40500, "name": "Main Realm", "dbFile": "40500.db", "enabled": true },
    { "port": 40501, "name": "Second Realm", "dbFile": "40501.db", "enabled": true }
  ]
}
Restart after editing. Per-realm overrides and generated secrets live in data/realms/<port>.env.
data/realms/ with the databases. Losing a realm's JWT secret logs everyone out; losing its secure-mode key makes encrypted messages unrecoverable. Do not set CATREALM_SERVER_ID in multi-realm mode.Bots & Plugins
CatRealm supports token bots that run anywhere and plugin bots that the server runs as child processes. Both are real realm members: assign roles to grant server permissions, while each user separately approves requested consent scopes such as profile access, mentions, and Bot DMs.
| Token bot | Plugin bot | |
|---|---|---|
| Create | Realm Settings → Bots | Add realm-plugins/<name>/bot.json |
| Runs | Your process or host | Child process of the realm server |
| Credential | Shown once; regenerable | Generated on every server boot |
{
  "name": "greeter",
  "username": "GreeterBot",
  "entry": "index.js",
  "scopes": ["interactions", "mentions"],
  "commands": [
    { "name": "greet", "description": "Say hello", "options": [] }
  ]
}
If a plugin has uninstalled npm dependencies, CatRealm waits for owner approval. Approve it from Realm Settings → Bots or with botinstall <name> in the server console.
Push Notification Relay Central Accounts
Self-hosted realms can relay channel @mention notifications to CatRealm mobile devices. This only applies to users signed in with a central CatRealm account; local-only accounts do not have central push tokens.
Generate a secret, add it to .env, and restart. The realm registers itself automatically with the central service using its public SERVER_URL.
node -e "console.log(require('crypto').randomBytes(32).toString('hex'))"PUSH_RELAY_SECRET=paste-your-generated-secret
AUTH_SERVER_URL=https://auth.catrealm.appENV Overview
CatRealm is configured through environment variables in your .env file. Below are the common settings from the current server template, including the latest hosting and media options.
.env file to version control. It contains secrets like JWT_SECRET and optional API tokens.Server
Core settings that define how your server presents itself.
| Variable | Default | Description |
|---|---|---|
PORT | 40500 | Port the server listens on |
SERVER_NAME | My CatRealm Server | Display name shown to users |
SERVER_DESCRIPTION | A self-hosted CatRealm server | Short description shown on the server listing |
SERVER_URL | http://0.0.0.0:40500 | Canonical server URL. Use the public HTTPS URL when enabling push relay or central media fallback. |
PUBLIC_SERVER_URL | — | Optional public origin used for generated invite links; falls back to SERVER_URL. |
# ── Server ────────────────────────────────────────────────────
PORT=40500
SERVER_NAME=My CatRealm Server
SERVER_DESCRIPTION=A cozy self-hosted realm
Security
Authentication and encryption settings.
| Variable | Default | Description |
|---|---|---|
JWT_SECRET | auto-generated | Secret used to sign JSON Web Tokens. Change this in production. |
SECURE_MODE | 1 in new templates | Message-at-rest encryption. 0 = disabled, 1 = enabled and permanently locked for that database |
SECURE_MODE_KEY | auto-generated when enabled | Encryption key for secure mode. Can be set manually (min 16 chars). |
SECURE_MODE=1 is set for a database, it cannot be reversed. CatRealm records the lock in the database and ignores a later attempt to disable it. Back up SECURE_MODE_KEY; without the original key, encrypted messages cannot be recovered.# ── Security ──────────────────────────────────────────────────
JWT_SECRET=change-this-to-a-long-random-string
SECURE_MODE=1
# SECURE_MODE_KEY= # auto-generated when SECURE_MODE=1Registration
Control whether new users can sign up on your server.
| Variable | Default | Description |
|---|---|---|
REGISTRATION_OPEN | true | Set to false to close registrations (invite-only mode) |
# ── Registration ──────────────────────────────────────────────
REGISTRATION_OPEN=true
Database
CatRealm uses SQLite — no external database server needed.
| Variable | Default | Description |
|---|---|---|
DB_PATH | ./data/catrealm.db | Path to the SQLite database file |
# ── Database ──────────────────────────────────────────────────
DB_PATH=./data/catrealm.db
Hosting Features
| Variable | Default | Description |
|---|---|---|
MULTI_REALM | false | Run the multi-realm supervisor. Realm definitions are stored in data/realms.json. |
BOTS_PLUGINS_ENABLED | true | Enable plugin discovery and child processes under realm-plugins/. Token bots remain available when disabled. |
PUSH_RELAY_SECRET | — | Secret used to register the realm for central-account mention push notifications. Use at least 32 random characters. |
AUTH_SERVER_URL | https://auth.catrealm.app | Central authentication, push relay, and optional media-fallback service. |
# Optional hosting features
MULTI_REALM=false
BOTS_PLUGINS_ENABLED=true
# PUSH_RELAY_SECRET=generate-a-random-32-byte-secret
CORS
Controls which origins can make requests to your server's API.
| Variable | Default | Description |
|---|---|---|
CLIENT_URL | * | Allowed client origin. Use * for open access, or set to your client's exact URL in production (e.g. https://app.example.com) |
# ── CORS ──────────────────────────────────────────────────────
CLIENT_URL=*
# Production example:
# CLIENT_URL=https://app.example.com
Uploads Directory
Paths where user-uploaded files are stored on disk.
| Variable | Default | Description |
|---|---|---|
UPLOADS_DIR | ./data/uploads | Directory for user avatar uploads |
UGC_IMAGES_DIR | ./data/ugc/images | Directory for user-generated content images (role icons, etc.) |
# ── Uploads ───────────────────────────────────────────────────
UPLOADS_DIR=./data/uploads
UGC_IMAGES_DIR=./data/ugc/images
Default Local Avatar Image Local Accounts Only
Set a default avatar URL for newly created local accounts. If not set, users will have no avatar until they upload one.
| Variable | Default | Description |
|---|---|---|
DEFAULT_AVATAR_URL | — | Full URL to a default avatar image (optional) |
# Optional: default avatar for new local accounts
DEFAULT_AVATAR_URL=https://cdn.example.com/default-avatar.png
Block Generic Usernames Decentral Only
Prevent users from registering with reserved or common usernames (e.g. "admin", "moderator"). Only applies to local (decentral) accounts.
| Variable | Default | Description |
|---|---|---|
BLOCKED_USERNAMES | — | Comma-separated list of blocked usernames (case-insensitive exact match) |
BLOCKED_USERNAMES_FILE | ./blocked-usernames.txt | Path to a newline-separated file of blocked usernames |
# Block specific usernames from registration (local/decentral accounts only)
BLOCKED_USERNAMES=admin,moderator,official,support
# Or use a file (one username per line):
BLOCKED_USERNAMES_FILE=./blocked-usernames.txt
Server Mode
Controls what type of accounts are allowed to join your server.
| Mode | Description |
|---|---|
mixed | Both local accounts and central CatRealm accounts are accepted. |
decentral_only | Runtime default when unset. Only local accounts created on this server; no central auth required. |
central_only | Only central CatRealm accounts are accepted. Local registration is disabled. |
| Variable | Default | Description |
|---|---|---|
SERVER_MODE | decentral_only | Account mode for this server |
AUTH_SERVER_URL | https://auth.catrealm.app | Central auth server URL used by mixed / central_only |
# Server mode (optional — runtime defaults to decentral_only)
# SERVER_MODE=mixed            # both local and central
# SERVER_MODE=decentral_only   # local accounts only (default)
# SERVER_MODE=central_only     # central accounts only

# Required for mixed/central_only:
# AUTH_SERVER_URL=https://auth.catrealm.app
Media Limits
Configure upload size limits for different types of media.
| Variable | Default | Description |
|---|---|---|
MEDIA_MAX_MB | 20 | Maximum size (MB) for media file uploads in chat |
COMPRESS_MEDIA | 0 | Set to 1 to compress chat images and MP4 video after upload. GIF, APNG, expressions, and server assets are excluded. |
LEVEL_OF_COMPRESSION | 6 | Compression strength from 0–9. Higher values use more CPU and reduce quality/size. |
AVATAR_MAX_MB | 10 | Maximum size (MB) for avatar image uploads |
THEATER_UPLOAD_MAX_MB | 2048 | Default Theater upload limit; owners can adjust it in Realm Settings. |
THEATER_UPLOAD_HARD_MAX_MB | 10240 | Hard ceiling for the owner-configurable Theater upload limit. |
THEATER_UPLOAD_RESERVE_MB | 256 | Disk space CatRealm keeps free when accepting Theater uploads. |
MAX_PINS | 300 | Maximum number of pinned messages per channel |
MENTION_ALIAS | @everyone | Alias for mentioning all members in a channel |
# ── Media Limits ──────────────────────────────────────────────
MEDIA_MAX_MB=20
COMPRESS_MEDIA=0
LEVEL_OF_COMPRESSION=6
AVATAR_MAX_MB=10
MAX_PINS=300
MENTION_ALIAS=@everyone
Voice & Theater Media
Current CatRealm clients use LiveKit for voice, camera, screen sharing, and Theater. Use bundled LiveKit, connect an external LiveKit deployment, or enable the authenticated central fallback.
| Variable | Default | Description |
|---|---|---|
HOST_LIVEKIT_MEDIA | false | Run the bundled LiveKit sidecar. Requires livekit-server; the CatRealm Pterodactyl runtime includes it. |
LIVEKIT_PUBLIC_HOST | SSL_DOMAIN | Public hostname used by clients when media has a different hostname. |
LIVEKIT_RTC_TCP_PORT | 7881 | Public TCP fallback port for LiveKit media. |
LIVEKIT_RTC_UDP_PORT_START | 50000 | First allocated UDP media port. |
LIVEKIT_RTC_UDP_PORT_END | 50100 | Last allocated UDP media port; may equal the start port for a small host. |
CENTRAL_LIVEKIT_FALLBACK | false | Use CatRealm central media for voice and Theater when local LiveKit is unavailable. Requires PUSH_RELAY_SECRET and a public server URL. |
MEDIA_TOKEN_TTL_SECONDS | 600 | Participant-token lifetime, clamped between 60 and 3600 seconds. |
# Bundled LiveKit example
HOST_LIVEKIT_MEDIA=true
LIVEKIT_PUBLIC_HOST=media.example.com
LIVEKIT_RTC_TCP_PORT=7881
LIVEKIT_RTC_UDP_PORT_START=50000
LIVEKIT_RTC_UDP_PORT_END=50100/rtc in bundled mode, but the TCP media port and every UDP port in the configured range must still be reachable publicly.Auto Update
When enabled, the startup launcher will pull the latest changes from your configured Git repository before starting the server.
| Variable | Default | Description |
|---|---|---|
AUTO_UPDATE | true | Enable or disable auto-update on startup |
GIT_REPO | Official repo URL | Git repository to pull updates from |
GIT_BRANCH | main | Git branch to pull from |
.git directory is present. If you downloaded a ZIP release, auto-update will not run.# ── Auto Update ───────────────────────────────────────────────
AUTO_UPDATE=true
GIT_REPO=https://github.com/VanillaChan6571/CatRealm-SelfHostable-Server.git
GIT_BRANCH=mainSSL / HTTPS Guide
HTTPS is required to use the CatRealm web app from any device other than localhost. CatRealm has built-in SSL support powered by Let's Encrypt — no separate reverse proxy needed.
Auto SSL via Cloudflare DNS Recommended
This method uses the DNS-01 ACME challenge, which means port 80 does not need to be open. It's ideal for servers behind firewalls or NAT. You just need a domain pointed to Cloudflare and a Cloudflare API token.
Ensure your domain (e.g. chat.example.com) has an A record in Cloudflare DNS pointing to your server's public IP. Use DNS only (gray cloud) for any hostname that carries LiveKit media ports.
Follow the steps below in the Cloudflare dashboard:
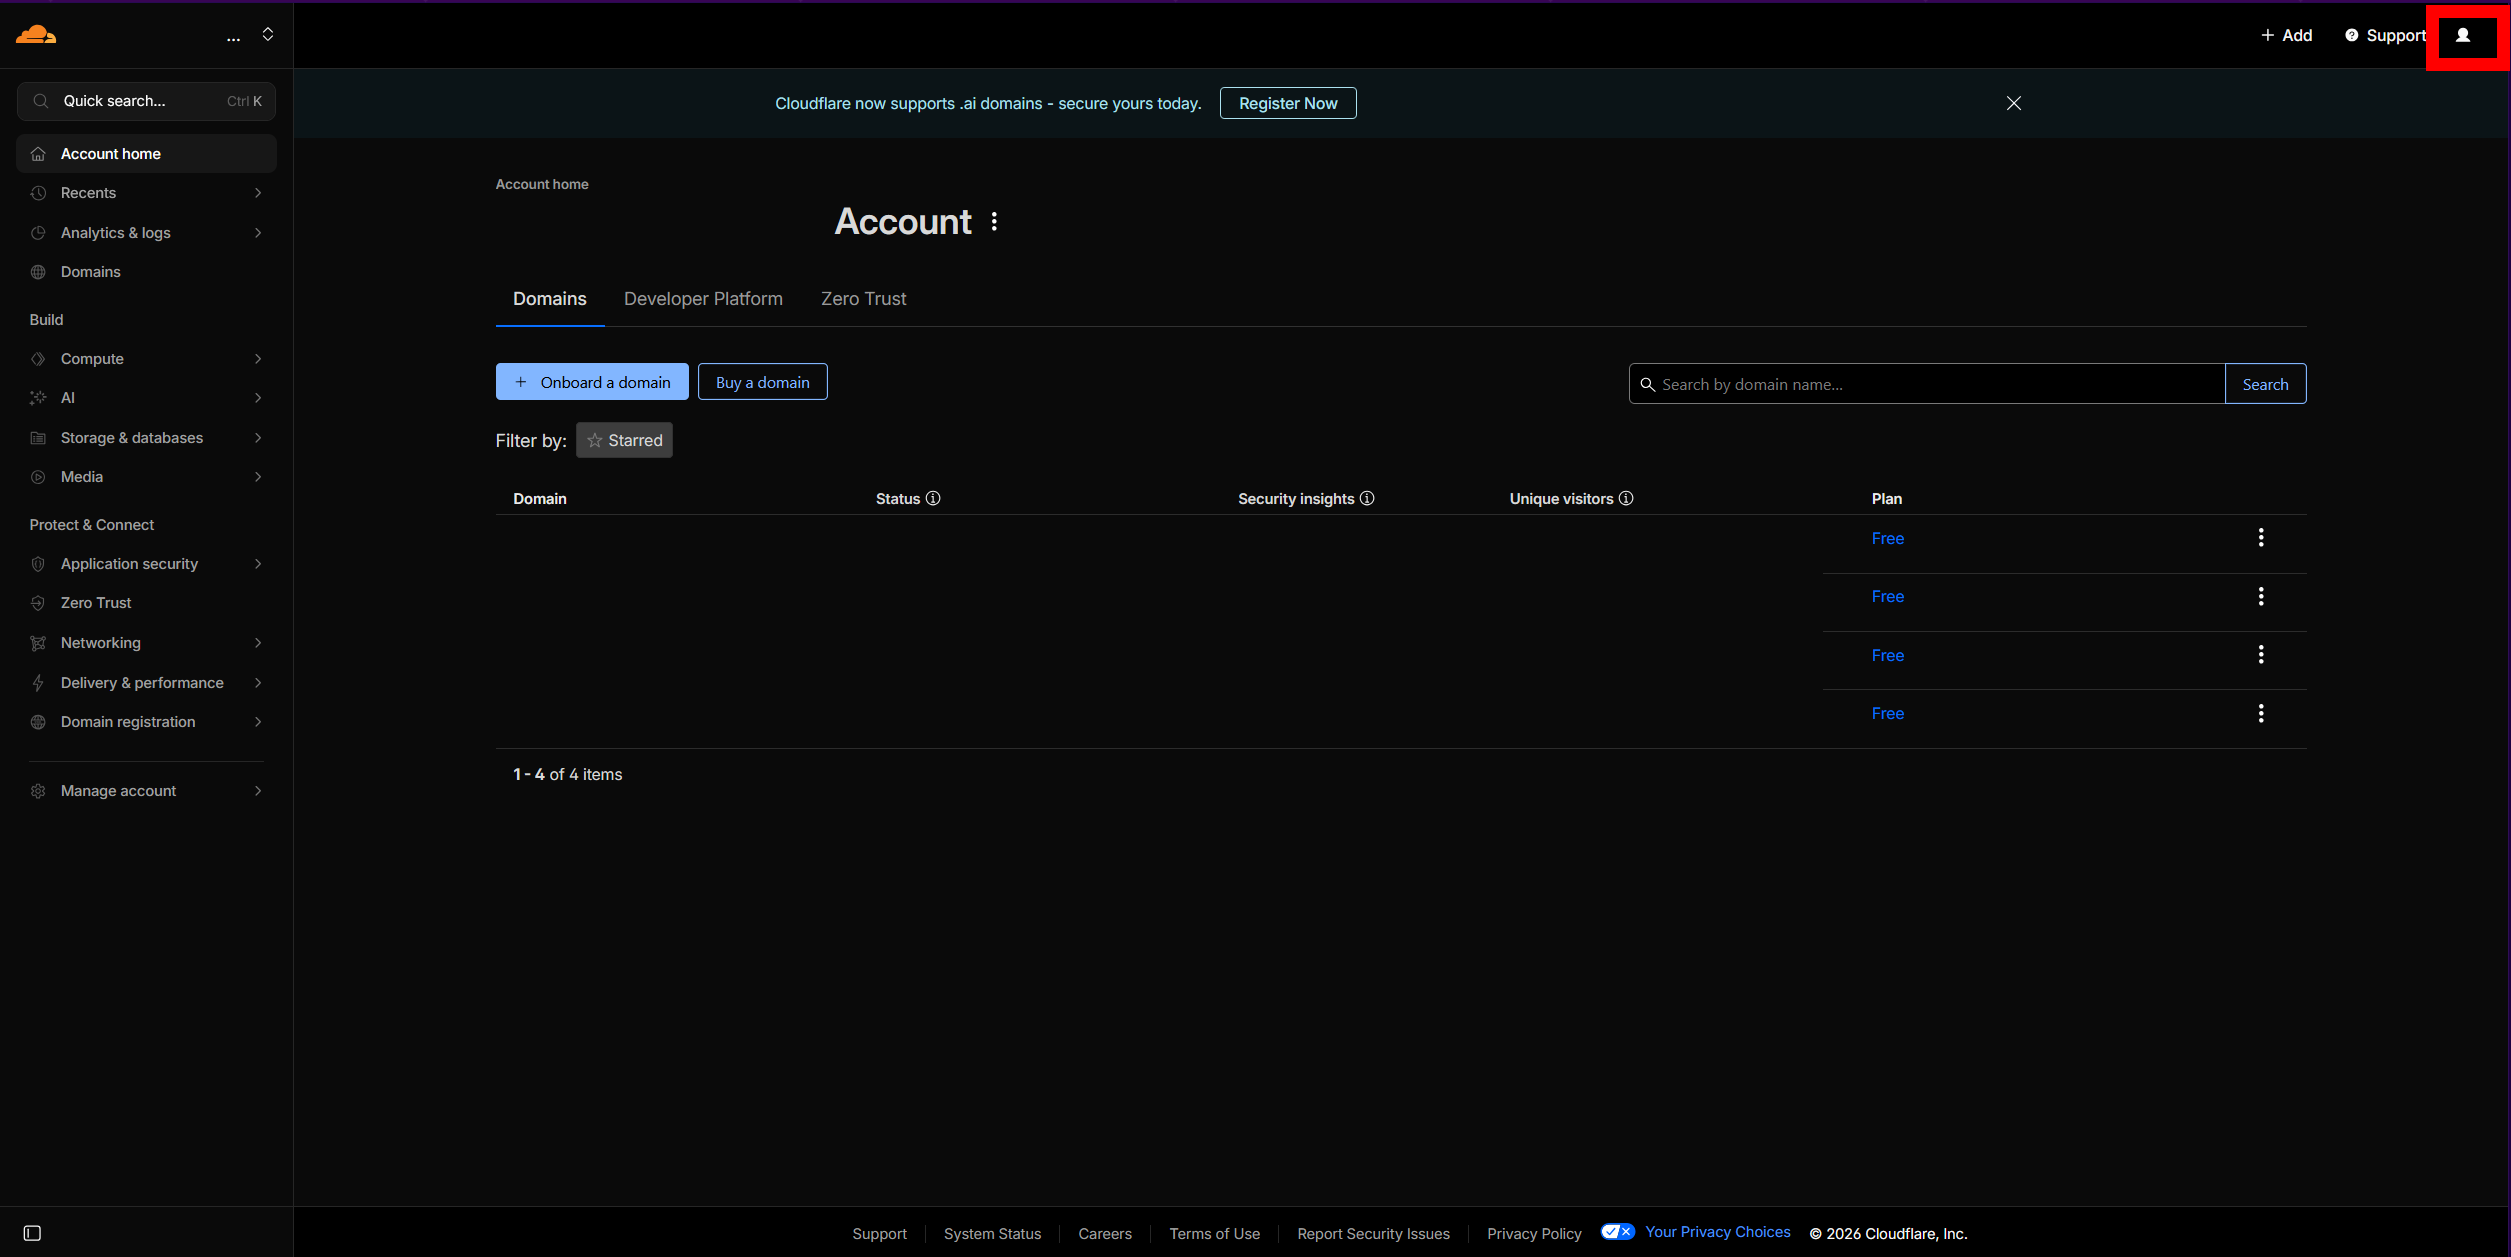
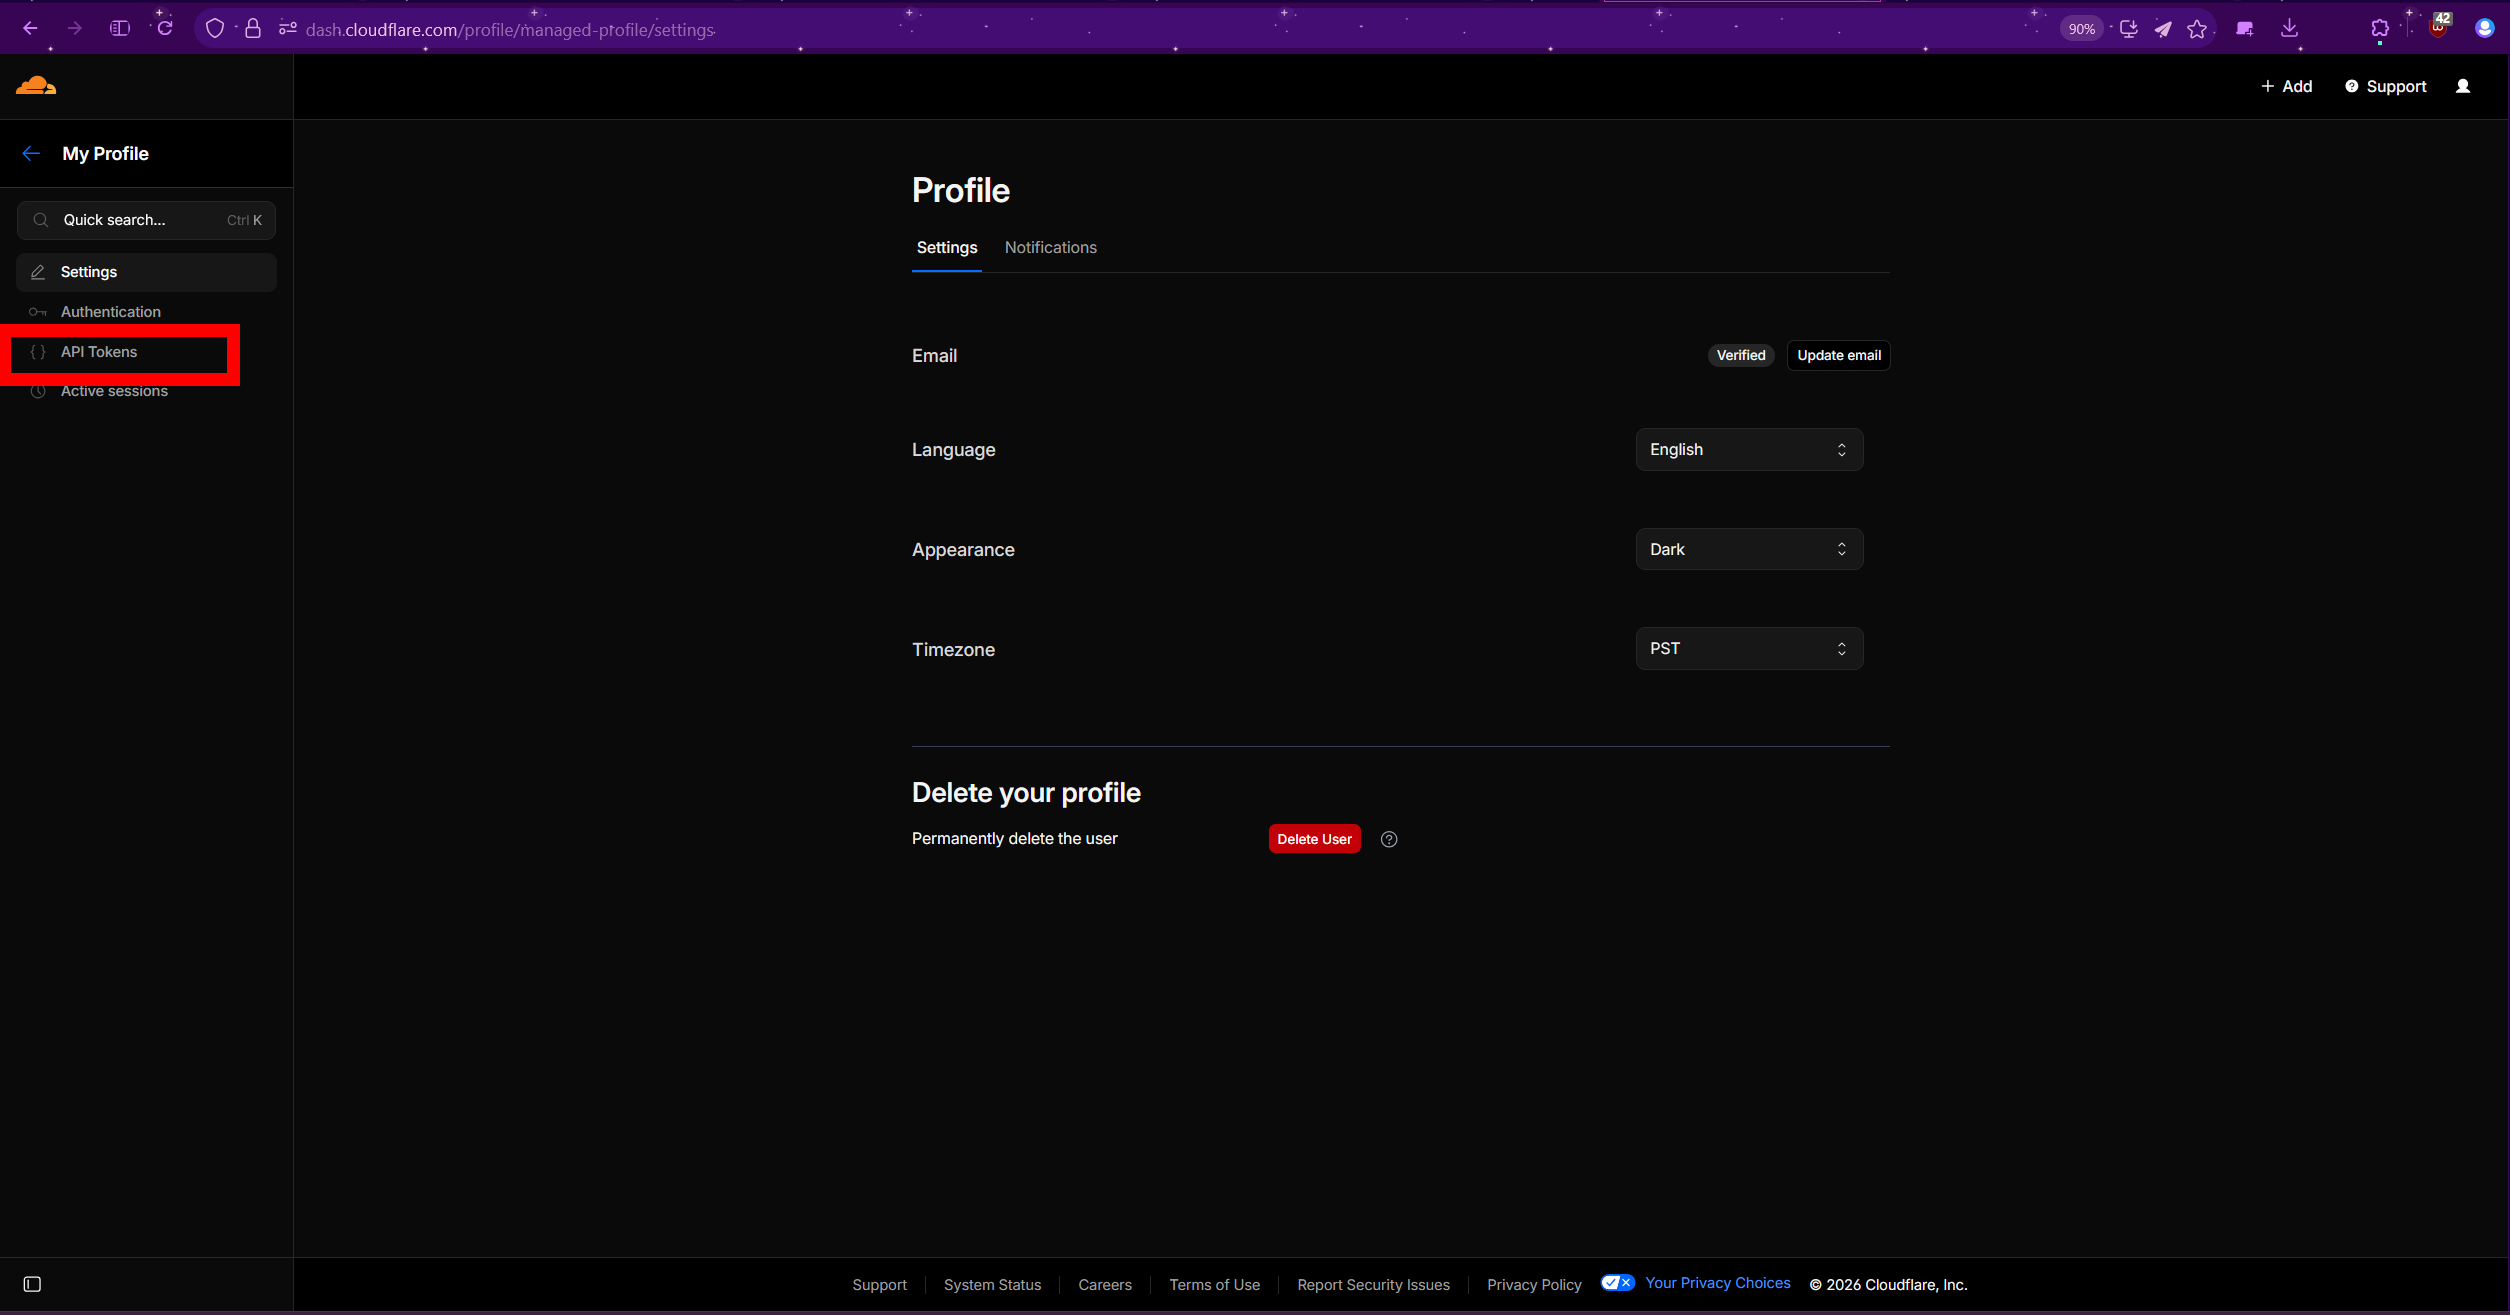
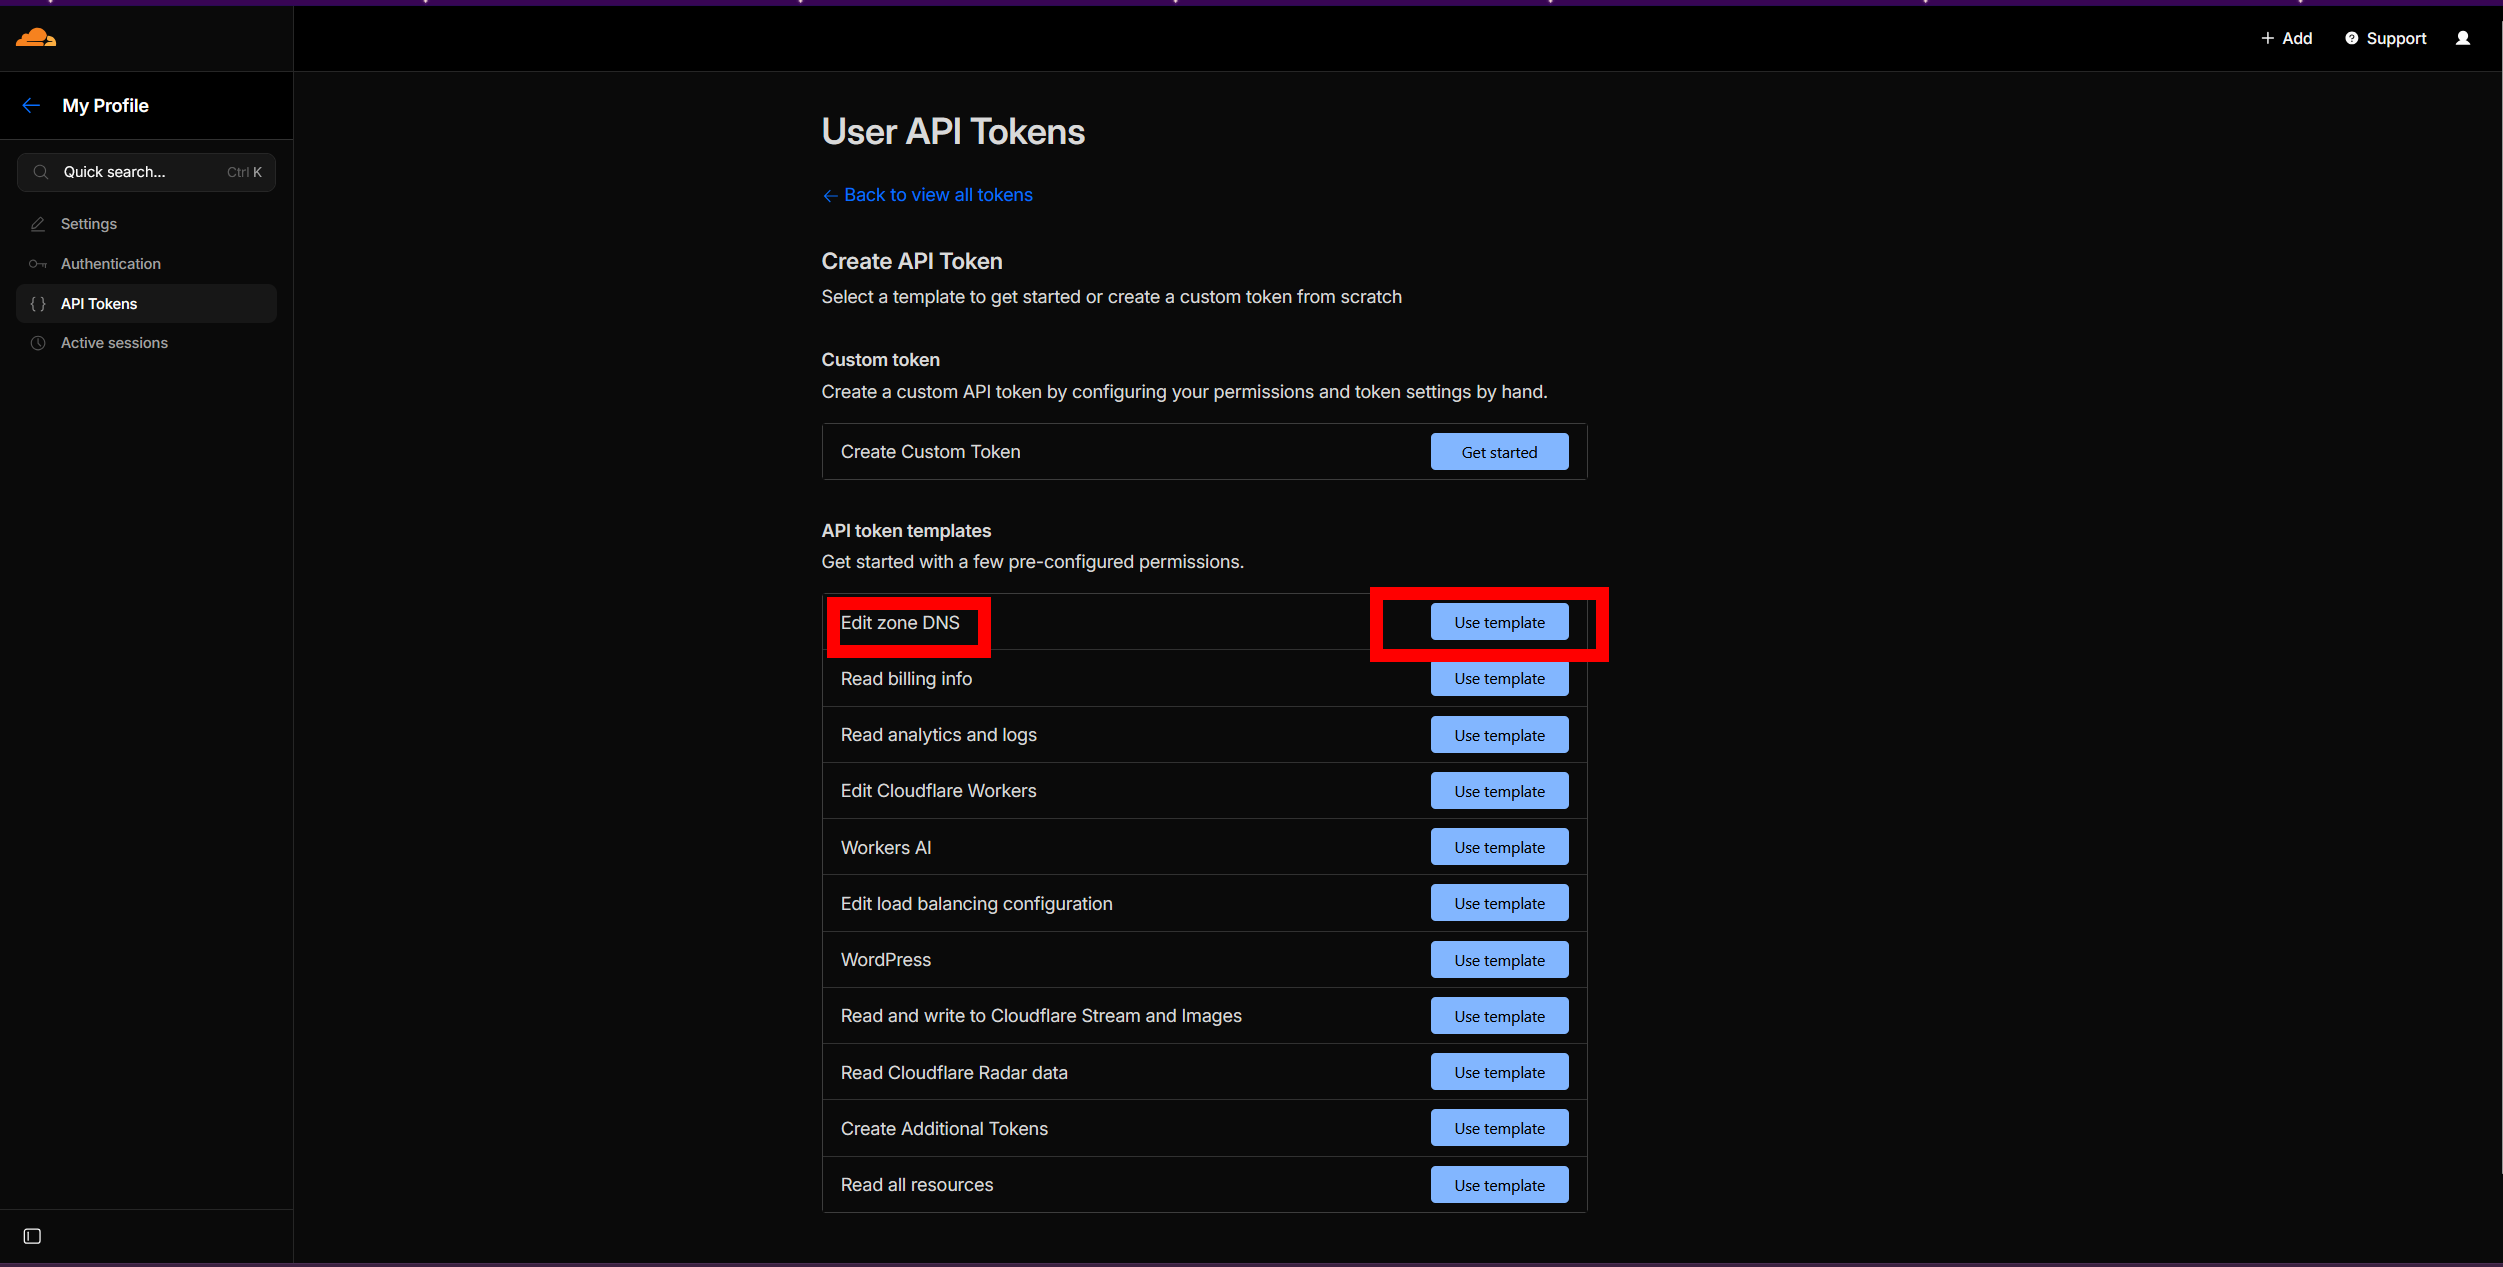
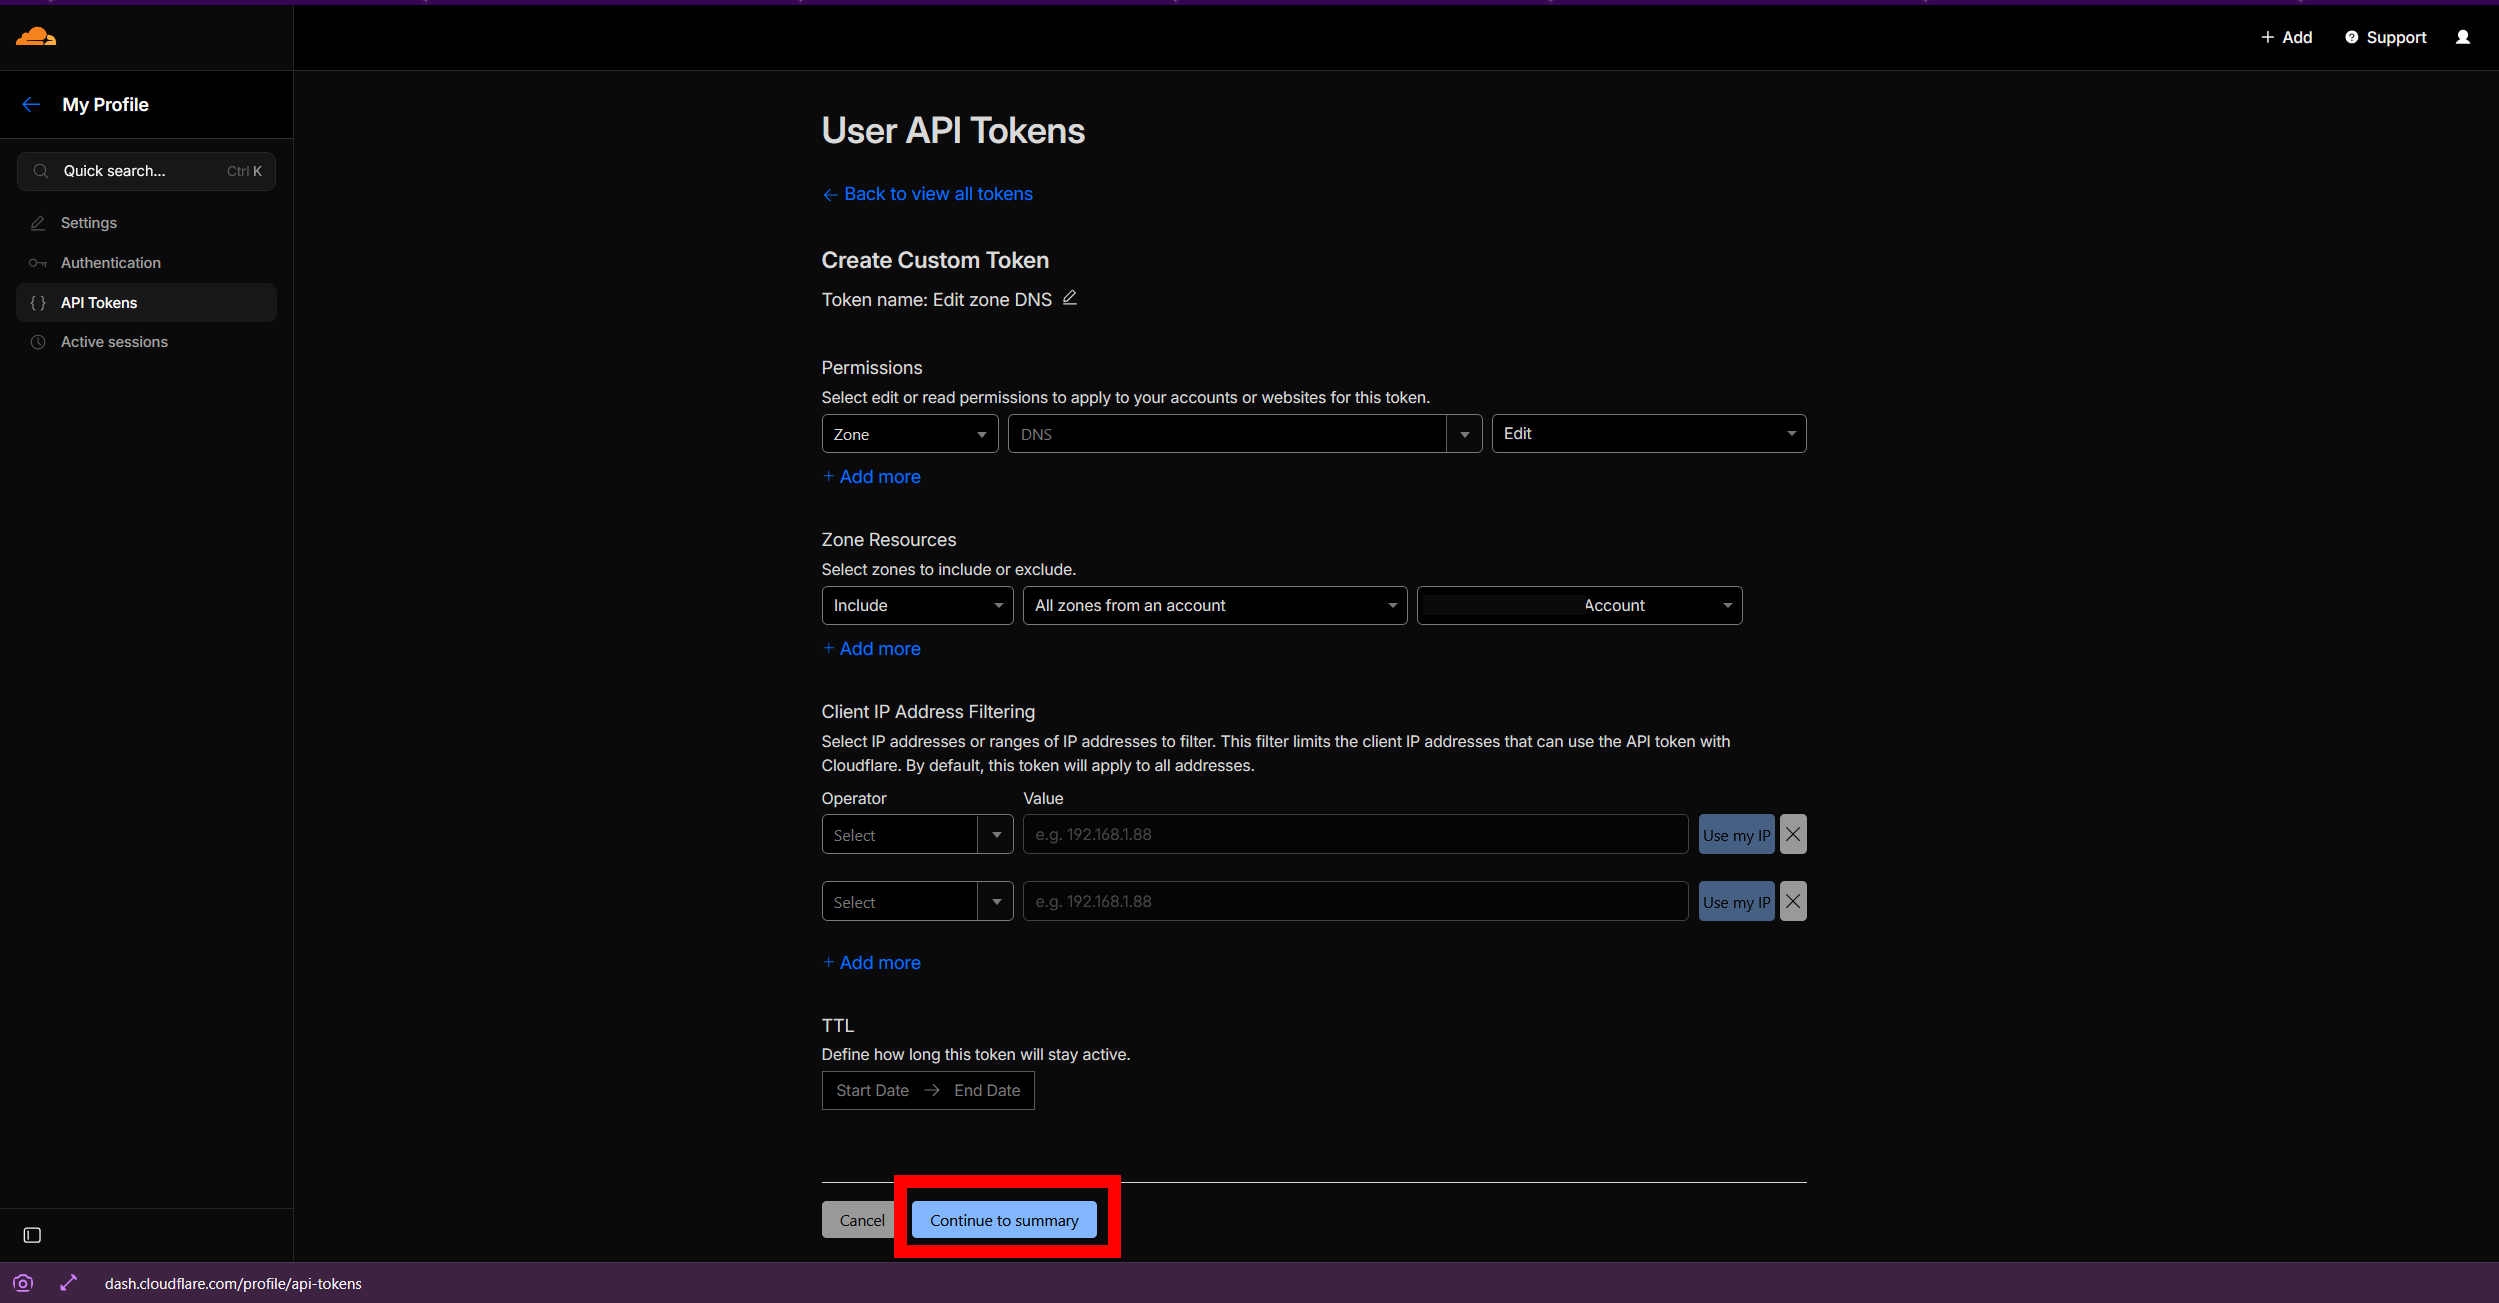
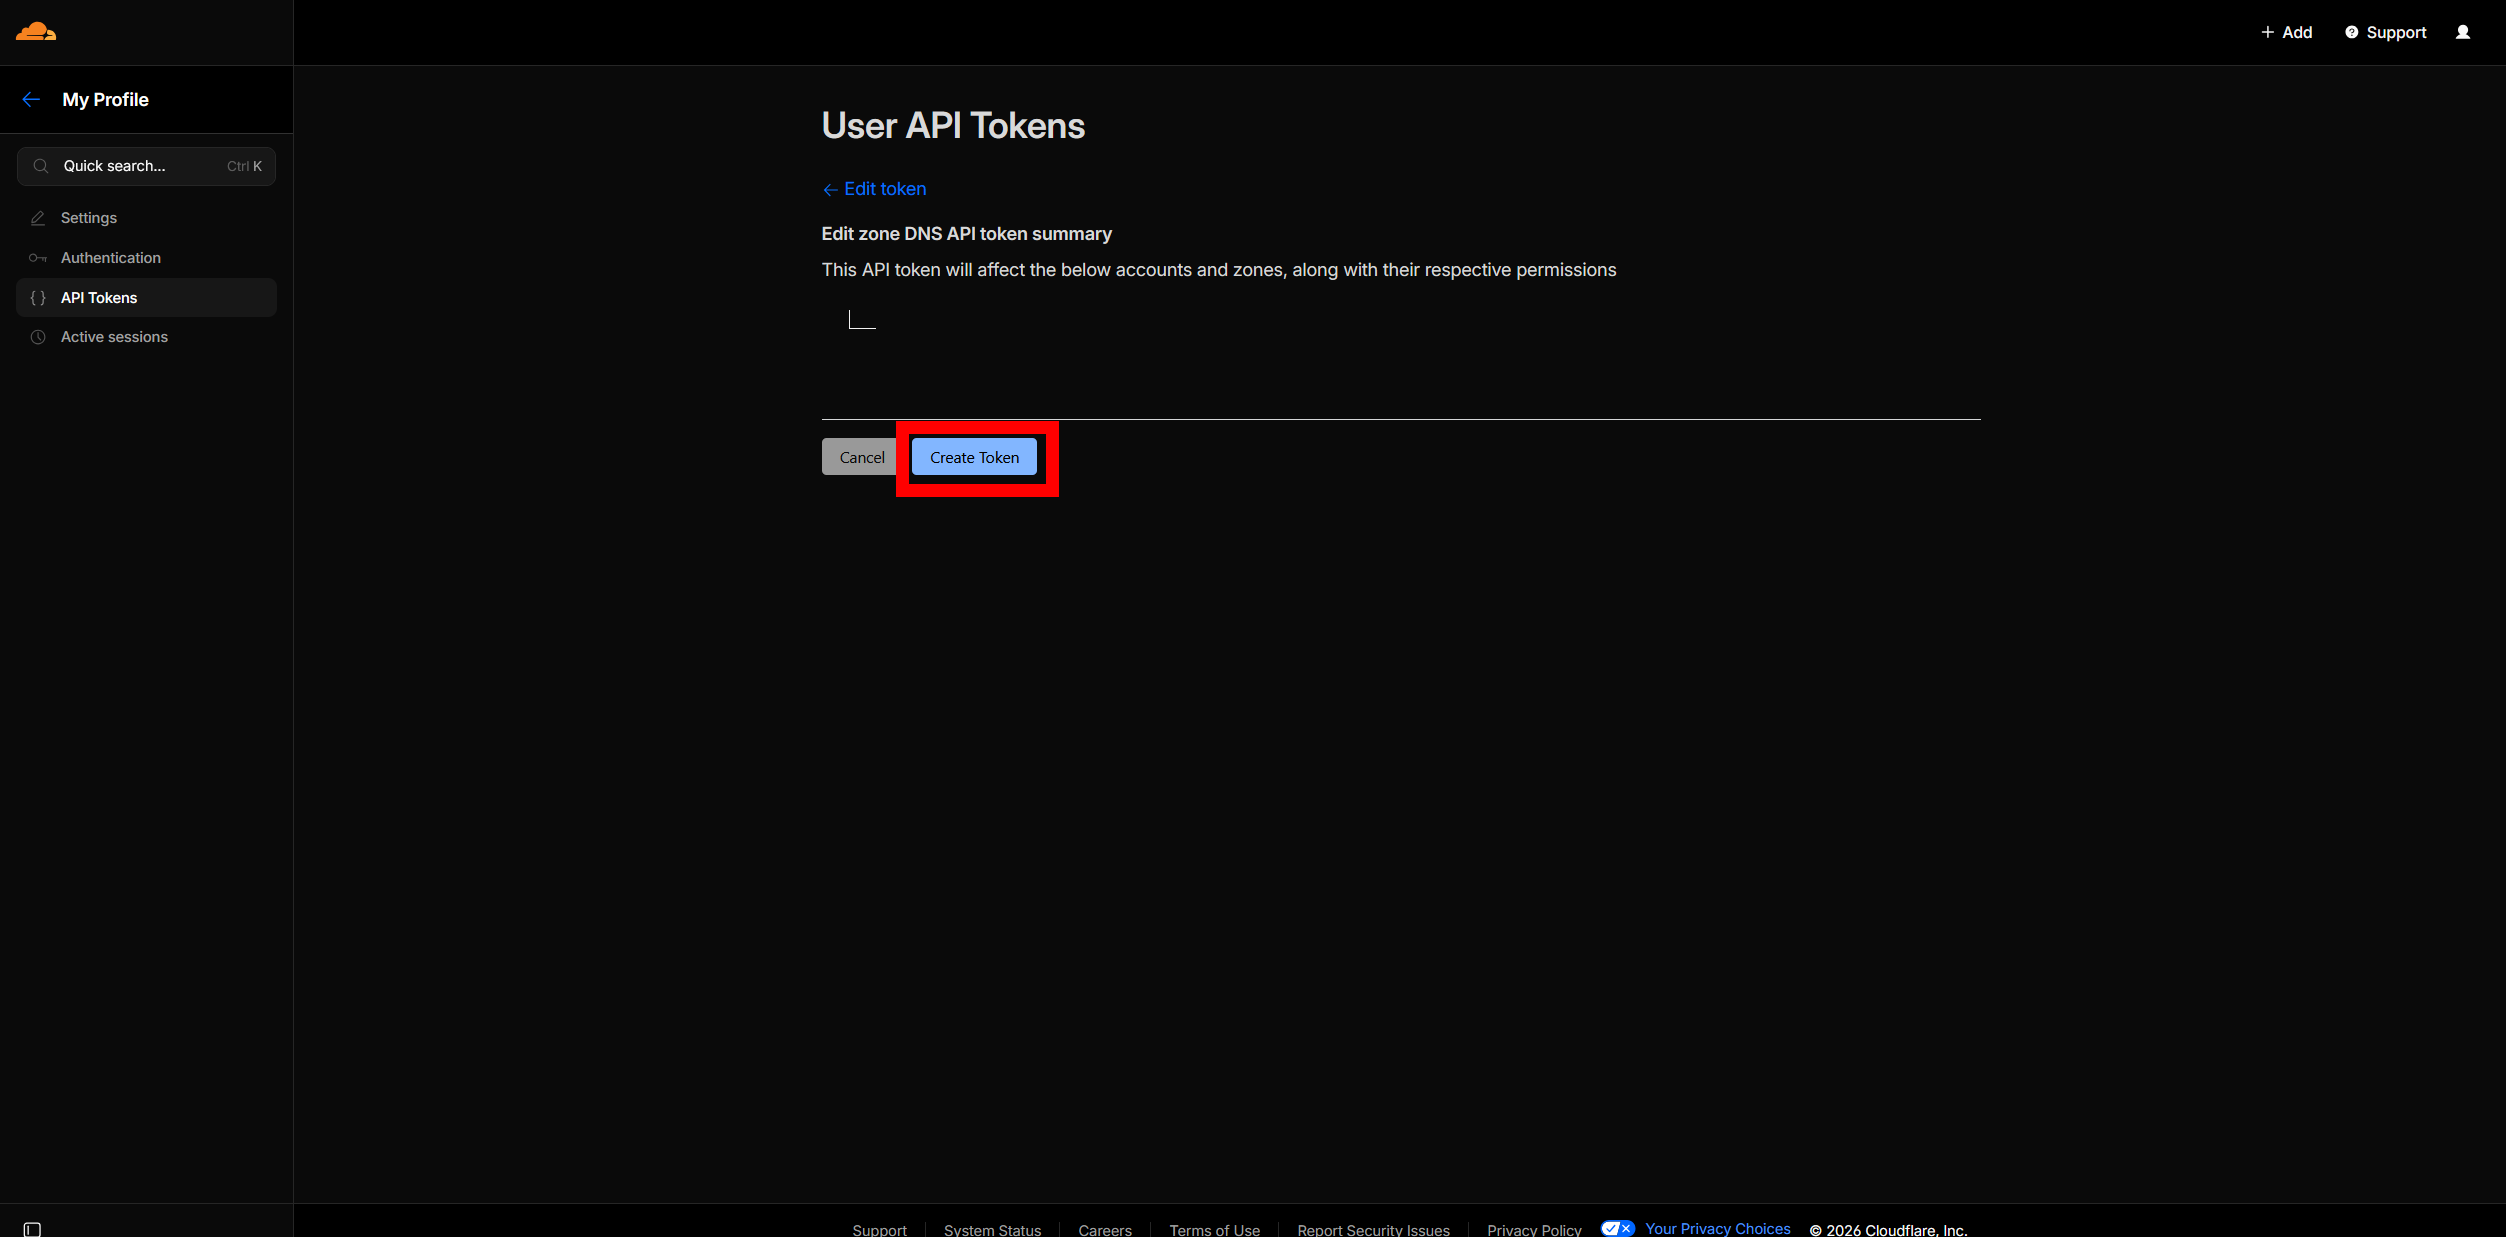
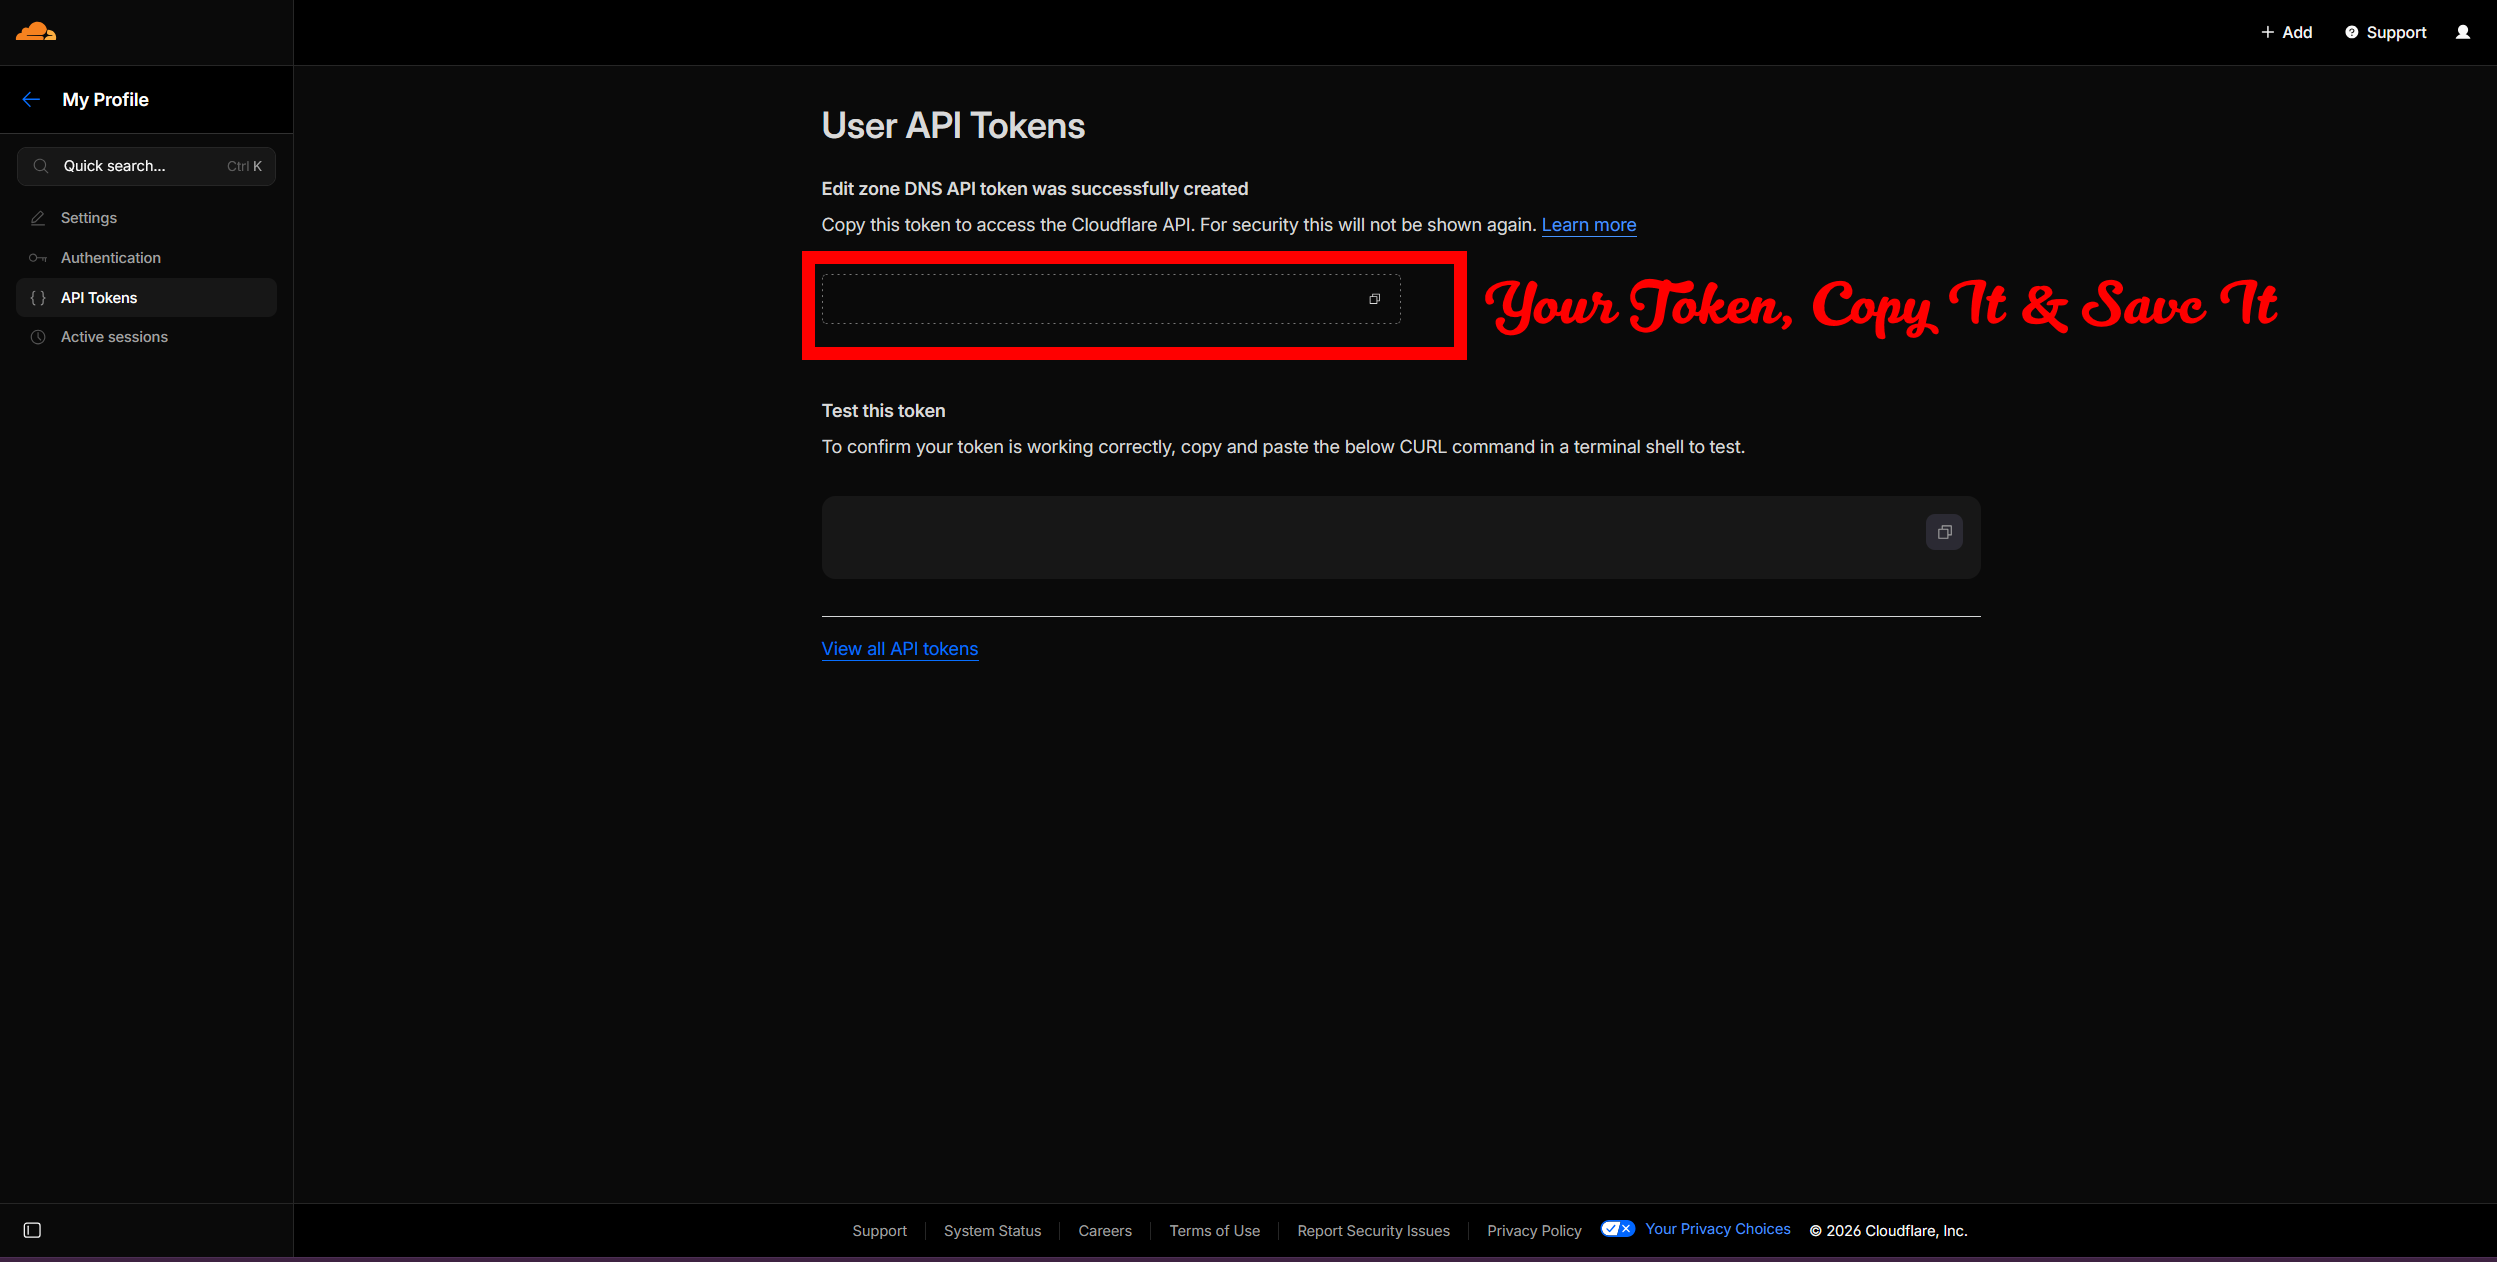
# Auto-SSL via Cloudflare DNS-01
SSL_DOMAIN=chat.example.com
SSL_EMAIL=[email protected]
SSL_DNS_PROVIDER=cloudflare
SSL_DNS_API_TOKEN=your-cloudflare-api-tokenCatRealm will automatically request a certificate from Let's Encrypt using the Cloudflare DNS challenge. Once issued, the server will serve HTTPS on port 443 and HTTP on your configured PORT.
SSL via Certbot
If you prefer to manage certificates manually, you can obtain them with Certbot and provide the paths to CatRealm.
sudo apt update
sudo apt install -y certbotUsing the standalone HTTP challenge (requires port 80 to be temporarily free):
sudo certbot certonly --standalone -d chat.example.com --email [email protected] --agree-tosCertificates are saved to /etc/letsencrypt/live/chat.example.com/.
# Manual certificate paths
SSL_CERT_PATH=/etc/letsencrypt/live/chat.example.com/fullchain.pem
SSL_KEY_PATH=/etc/letsencrypt/live/chat.example.com/privkey.pemCertbot installs a renewal cron job automatically. Ensure CatRealm reloads after renewal by adding a post-renewal hook:
# /etc/letsencrypt/renewal-hooks/post/catrealm.sh
#!/bin/bash
pm2 restart catrealm
chmod +x /etc/letsencrypt/renewal-hooks/post/catrealm.shAdvanced
Advanced configuration for power users and production deployments.
Connect External LiveKit
Use an external LiveKit deployment when media should run on separate infrastructure. CatRealm keeps the API secret server-side and mints short-lived participant tokens for clients.
| Variable | Description |
|---|---|
MEDIA_LIVEKIT_ENABLED | Set to true to enable the external provider. |
MEDIA_LIVEKIT_URL | Internal URL CatRealm uses for LiveKit server API calls. |
MEDIA_LIVEKIT_PUBLIC_WS_URL | Public wss:// URL given to clients. |
MEDIA_LIVEKIT_API_KEY | LiveKit API key. |
MEDIA_LIVEKIT_API_SECRET | LiveKit API secret. Never expose this in client configuration. |
MEDIA_LIVEKIT_ENABLED=true
MEDIA_LIVEKIT_URL=http://127.0.0.1:7880
MEDIA_LIVEKIT_PUBLIC_WS_URL=wss://media.example.com
MEDIA_LIVEKIT_API_KEY=your-api-key
MEDIA_LIVEKIT_API_SECRET=your-api-secret
MEDIA_TOKEN_TTL_SECONDS=600
Firewall Checklist
- Expose the public secure WebSocket endpoint used for LiveKit signaling.
- Expose LiveKit's configured TCP media fallback port.
- Expose the full configured UDP media range.
- Keep the API secret on the CatRealm server only.
HOST_LIVEKIT_MEDIA=true unless you already operate an external LiveKit deployment.